This documentation was requested by a Reddit user! Thank you for asking as it prompted me to create another video!
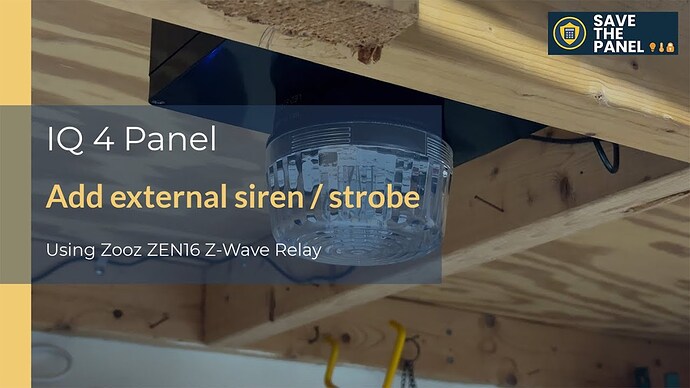
Adding a Seco-Larm Strobe/Siren to IQ 4 Panel via Z-Wave
This integration leverages a Zooz ZEN16 relay to connect a 12v Seco-Larm Stobe with integrated siren to an IQ 4 Panel via z-wave. The documentation here provides the connectivity and setup details. For a full discussion of the reasons why, use cases, and other great tidbits, be sure to watch the accompanying video on our YouTube channel:
Components Utilized
-
The IQ 4 Alarm System including:
- IQ 4 Alarm Panel
- Alarm.com (ADC) website / app for automation logic
-
Seco-Larm SL-1301-SAQ
-
Zooz ZEN16
-
12v 2a power supply
-
Project Box (to make it a single unit that can be mounted somewhere, optional)
- Amazon.com link (Project Box with Fixed Ear Black 7.87 x4.72 x2.95 inch (200x120x75 mm))
- 5.5 x 2.1 mm DC Power Jack Socket Threaded Female Panel Mount Connector
- Panel mount fuse holder w/1a fuse
Design Standards
- Since the siren requires 12v, we decided to use a relay that could be driven off of 12v as well for a common power source.
- Uses Zwave for the relay, since it is integrated into the IQ 4 panel by default.
Overall Configuration
Wiring
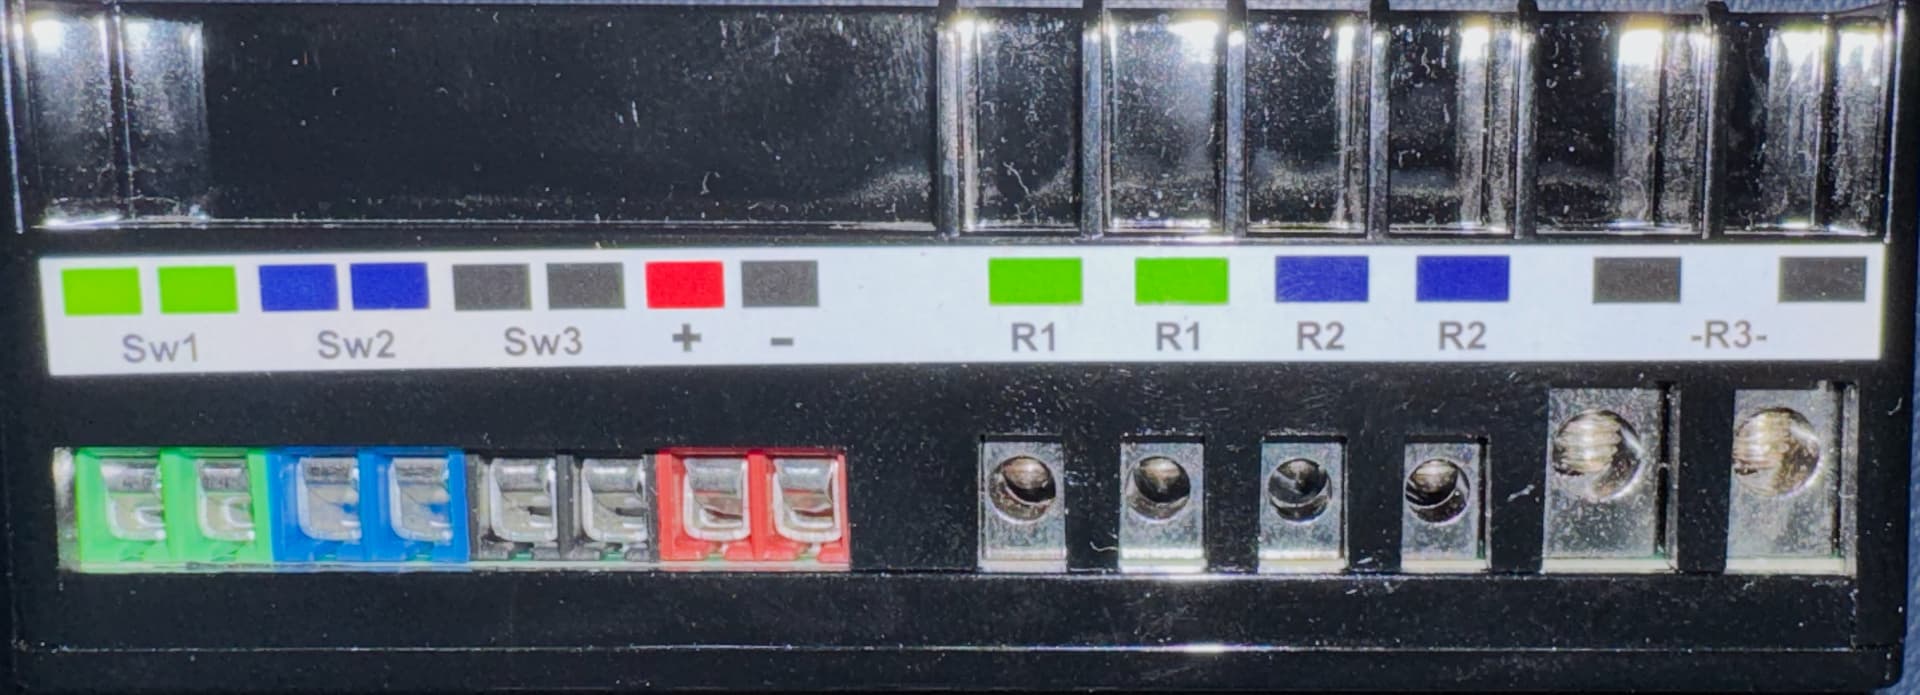
Connect the + and - connections from the power supply to the cooresponding + and - terminals on the ZEN16 to supply power.
(You only need one of the three relays on the ZEN16, so we chose R1, but any could be used.)
Install a jumper wire connection from the + terminal to one of the two terminals for your selected relay (R1 in this example).
Connect the other side of the relay (R1) connection to the Positive (Red) wire on the Seco-Larm.
Install a jumper wire connection from the - terminal to the Negative (black) wire on the Seco-Larm.
When completed, the R1 relay is switching the Siren off/on by breaking the positive 12v connection, but keeping power on to the ZEN16 constantly.
Adding ZEN16 to IQ 4 Panel
Add the ZEN16 to the IQ 4 panel, just as you would like any other Z-Wave device. This section just has a few pointers to help:
To put the Zen16 in inclusion/exclusion mode, press its button three times quickly. The blue light will flash.
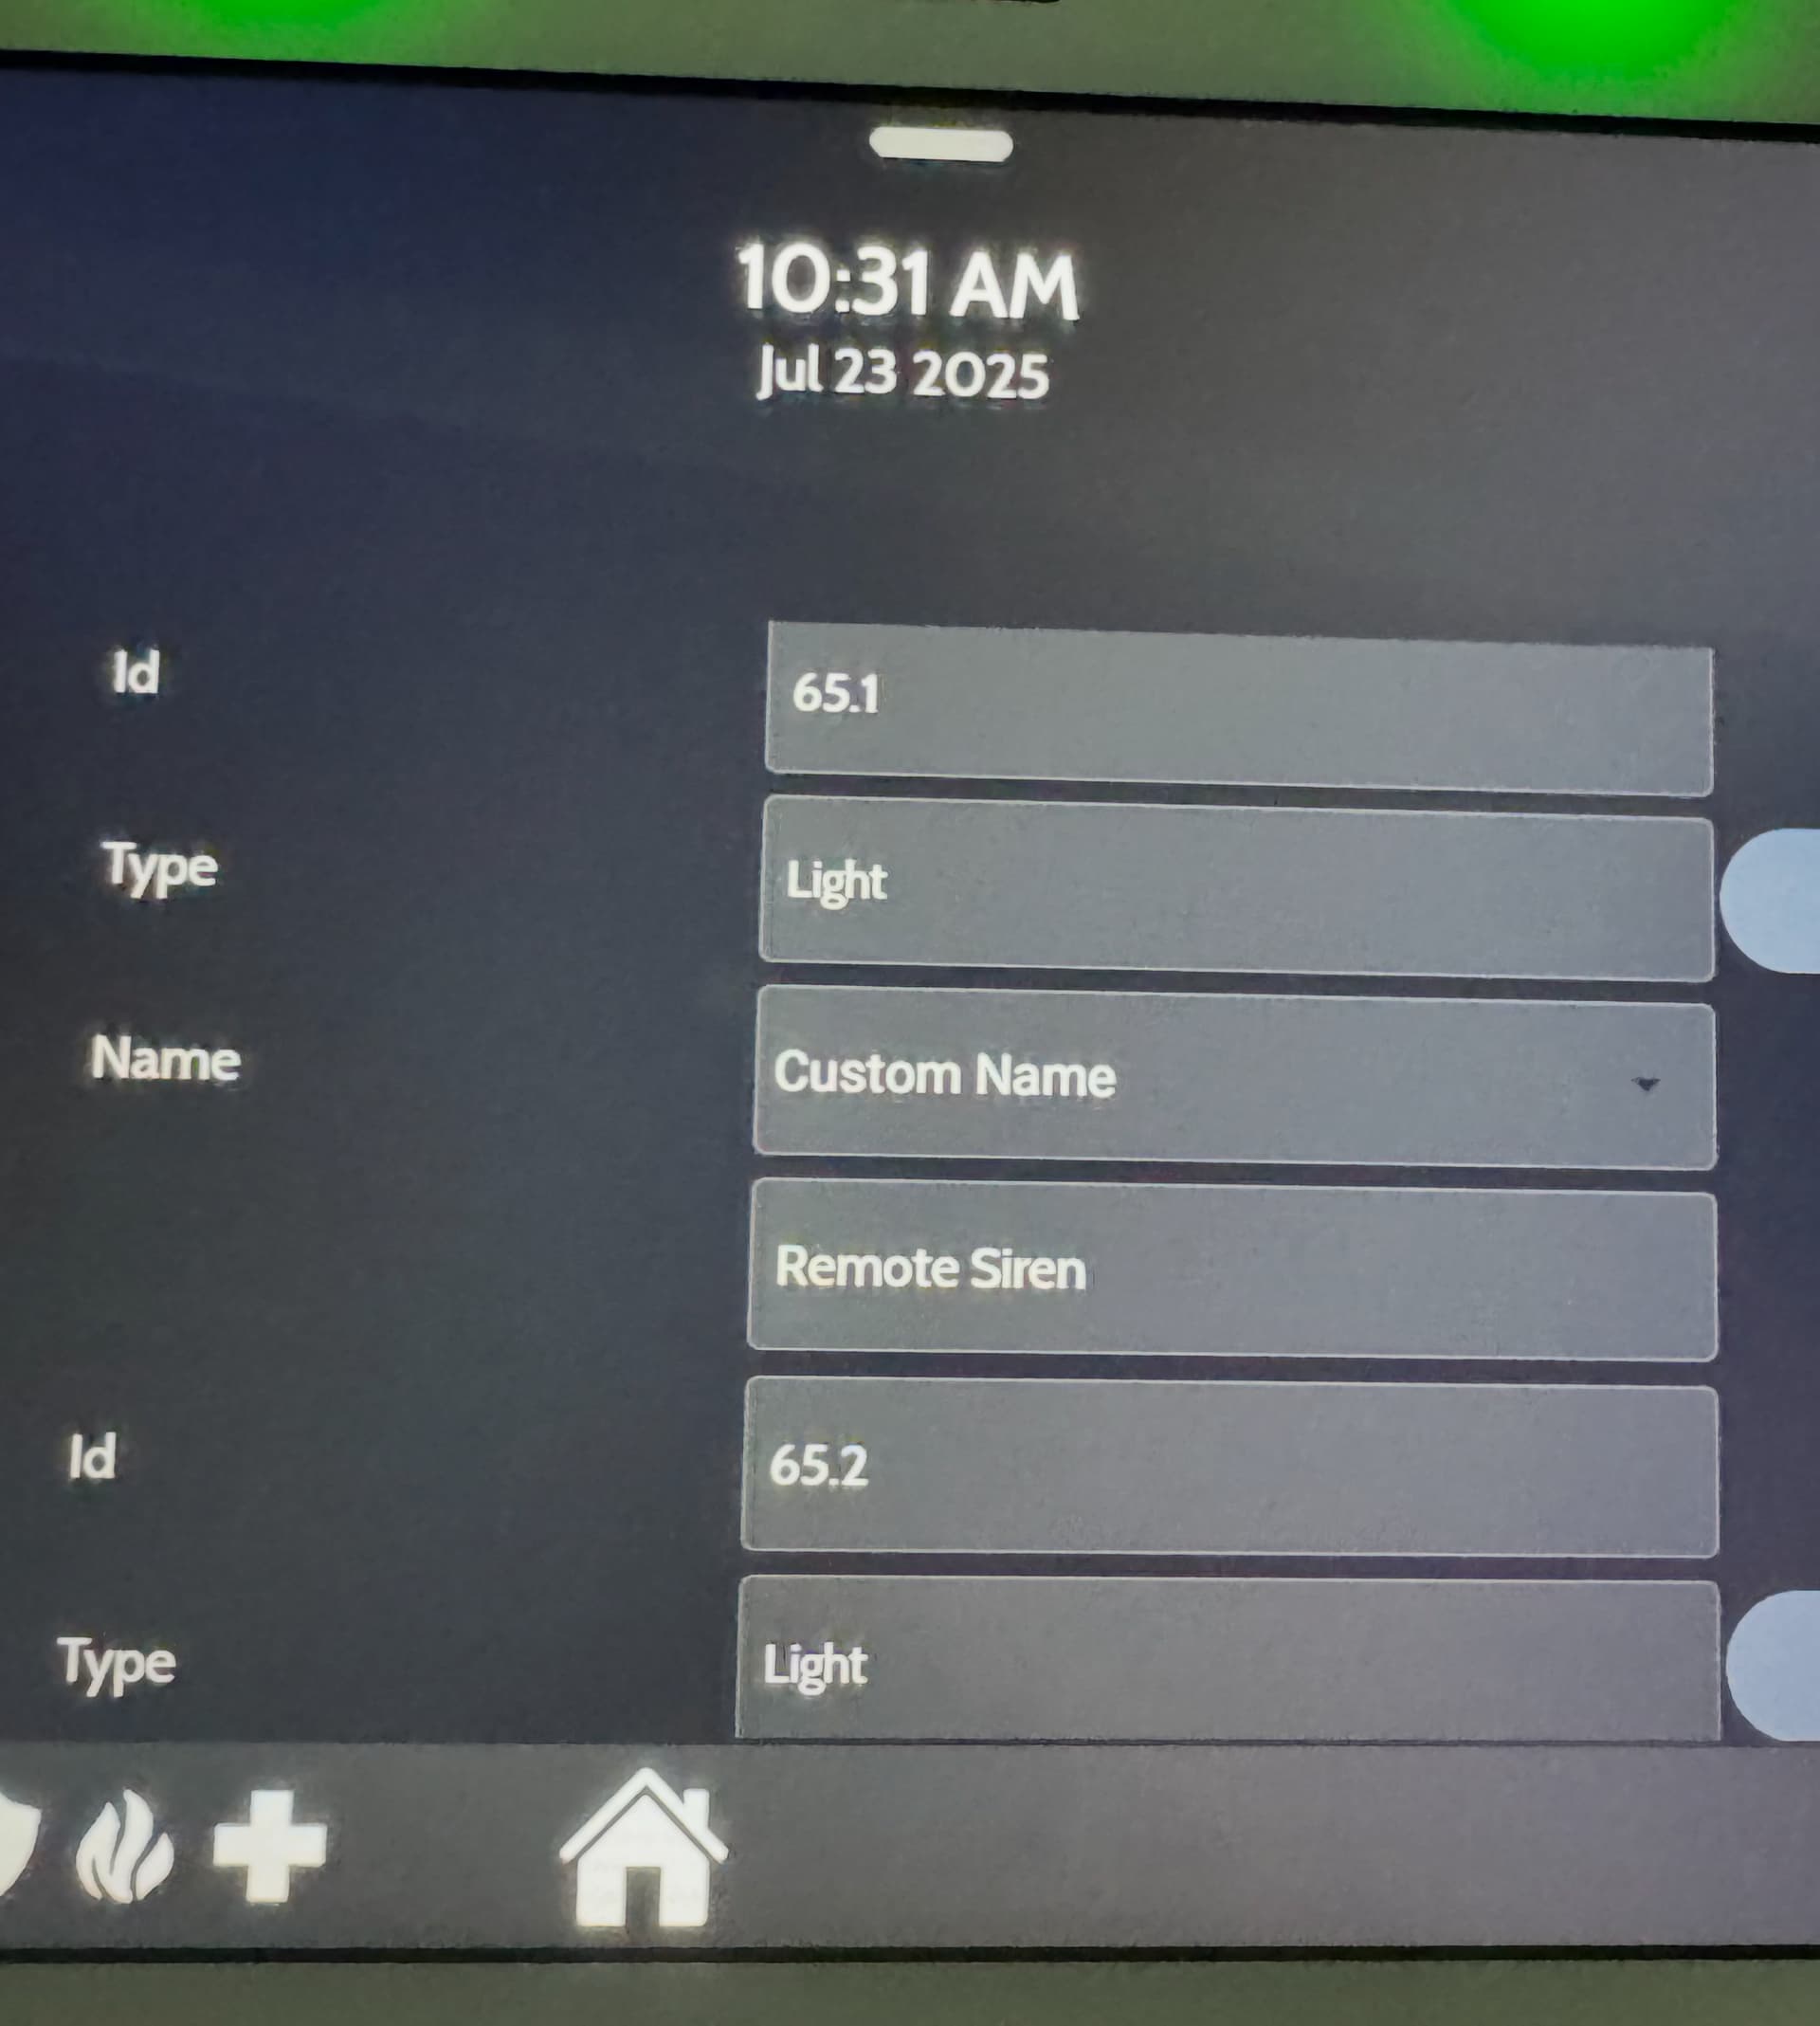
Once joined to the IQ 4 it should show up with all three endpoints (one for each relay) being visible, and able to be named independently. Be sure to label the corresponding relay appropriately so you can easily find it later. The endpoints are labeled the same as the relay number - where xx.1 is R1 and xx.2 is R2, etc.
At this point, you should be able to turn the siren off/on just like any other z-wave device.
Programming
When to actually turn this off or on is completely based on your programming of automations. The ADC automations will simply view this as another “light” that can be turned off or on. This example is very basic, but there are many use cases that can be developed.
In this case, I created two automation rules:

When an intrusion alarm happens, activate the siren for 10 minutes
The image above includes the detail of how this is setup, however there are many options under alarm trigger that can be confusing.
Depending on how your system is configured, you’ll see a number of trigger options there. The important one is ‘any intrusion sensor’ - which we used in this example. However I’ve also set this up in my home on other triggers as well, such as SYSTEM which includes panel panic buttons, and “Any Fire, Smoke, or CO Device” which triggers on those devices.
When the panel is disarmed, shut off the siren
This is relatively self-explanatory. It works to ensure that you can immediately silence the siren rather than waiting the 10 minutes for the first rule to time out.
One note: these alarm triggers will fire when the system is actually in alarm. In other words, when testing your system panel may start sounding and the red “ALARM” screen may appear, but the rule will not fire to start the siren. That may be normal. If you look at your activity log in alarm.com, you may see that it is listed as a ‘pending alarm’. In that case, you need to wait for the dialer delay to allow the pending alarm to mature into an actual alarm to see the automation trigger. This can vary based on your system’s configuration.
This setting can be found under dealer or installer settings, and is called “Dialer Delay”. (In the video, my test system was set to a 30 second dialer delay.)
Boxing it all up
I didn’t show the assembly of this into a single project box that was mounted in my garage, but I listed the parts above. Basically, I made it pretty by installing a jack in the side for the power supply to plug into, and installed a 1a fuse just for good measure.
The zen16 was attached to the box with double-sided 3M tape and the Seco-Larm was screwed into the box cover, with holes drilled for the wires.
You may notice in the pictures of the finished product I had a second plug labelled 5V… That is because I combined a second project into the same box for power monitoring so I could utilize some unused relay ports on the ZEN16. I like the fact that box is a little larger, as it allows me to use it for multiple projects at the same time. Your setup can be completely different.
What’s next
Stay tuned for a new video on how to wire the Seco-Larm into the IQ Hardwire 16, instead of using a z-wave relay. It is a really clean install if you can get a wire from your Seco-Larm to the IQ Hardwire (and you have the IQ Hardwire of course). I may cover the Hardwire PowerG as well in that video, but that is a rather textbook installation.